
If uniform documents are to be distributed to a wider audience, it quickly becomes tedious if you have to repeatedly enter names, customer numbers and addresses manually. Maintaining a bibliography by connecting a database is also far more convenient.
TextMaker NX and TextMaker 2024 provide an easy option for populating letters, envelopes, and address labels with dynamic data from a database. All you have to do as a user is select a record and determine where the data should be inserted.
Supported formats
TextMaker accepts data in multiple table and database formats. It only reads tables (PMDX, XLSX, CSV), but it does not allow them to be edited. In contrast, TextMaker provides a convenient editor for databases in SQLite and dBASE formats.
This database module is opened as soon as you choose one of the two commands on the Mailings tab in the group Database. You can use the command Edit database to edit an existing database and the command New database to create a new database.
When opening existing dBASE databases from third-party programs, the character set must first be selected. This is usually "dBase/DOS" or "dBASE/Windows". The "dBASE/Unicode" format is a special variant developed by SoftMaker that supports Eastern European and Asian character sets. The only disadvantage is its compatibility: Only a few providers of other programs can cope with the variant.
However, the much more up-to-date format is SQLite. Its advantages over dBASE include standard Unicode support and the ability to handle additional data field types. Its main advantage, however, is its support of text fields without length restrictions ("LONG TEXT" field type).
If the SQLite database contains multiple tables, you are first shown a dialog box in which you can select the desired table (data source). Ignore entries whose name starts with "sqlite_". Those entries are internal control data from SQLite and are not usable tables.

Creating new databases
The database module appears by default as a document tab in the TextMaker program window. To see it as its own window, you can drag the tab out of the program window while holding down the mouse button. This makes it easier to keep track of things because you can then see the database and the related document side by side.
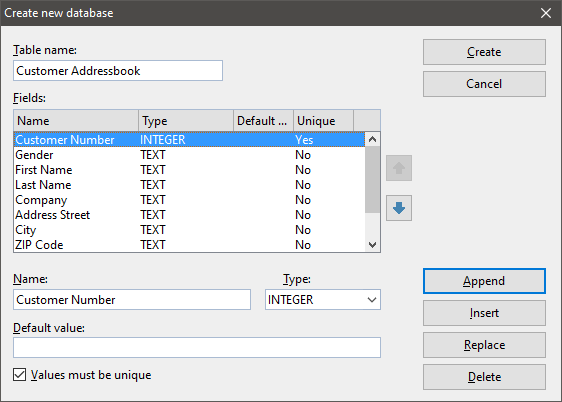
When creating a new database, you must define a table and its fields once you have assigned the database name. Each field is assigned a name and a field type. Furthermore, you can use the "default value" to automatically prepopulate a field with a specific value when appending a new record. There is also the option "Values must be unique". This is recommended for fields such as customer numbers or footnote identifiers, where there must be no duplication.
The "TEXT" type is usually the best choice – even for ZIP codes and phone numbers that would presumably be numbers. This is the case because if you define postal codes as an integer, the database would remove all leading zeros, and you would be unable to insert hyphens, plus signs, or dashes in phone numbers. In contrast, the "INTEGER" type is useful for customer numbers.
You can correct typos by clicking on the entry, correcting the necessary field values and choosing the Replace button. The order of the fields can be corrected using the blue arrows next to the field list. Once the entries have been completed, choose the Create button to create the desired database.
Integrating database fields into documents
To display the fields from the database in a document, such as a mail merge, the database must first be assigned to that document.
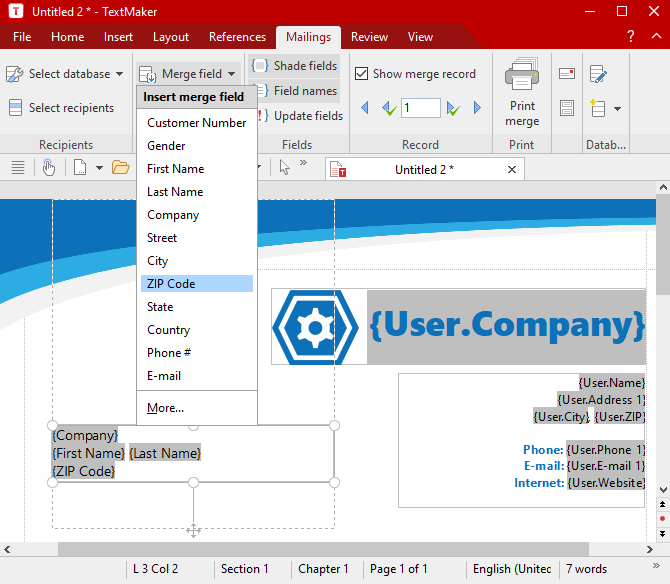
If you want a mail merge to access an address database, first choose Mailings | group Recipients | Select database and then the command Use existing database to select your address database. Then place the cursor in the desired places in the document and select the relevant fields via Mailings| group Insert | Field.
Designing mail merges
For mail merges, the document initially displays only the field names in curly brackets: {NAME1}, {NAME2}, etc., instead of the database contents. To visually highlight the database fields, the Mailings tab provides the Shade fields button in the group Fields.
To display the names of the database entries instead of the fields in TextMaker, enable the option Show merge record in Mailings | group Record. You can then use the Field name button in the group Fields to switch between the two displays.
The command Select recipients under Mailings | group Recipients opens the database module. Here, you can choose to send the mail merge only to specific recipients. The Mailings | group Print | Print merge button leads directly to the print dialog.
Envelopes and labels
The data from the database can also be easily used to print envelopes. To do so, choose the command Mailings | Create | Envelope. For lists and labels, use Mailings | Create | List / Label.
In the envelope editor, use the Database field button to insert the desired fields. Format the font using the small button above the input area and select the desired paper settings.
In the list and label editor, use the Database field button to insert the desired fields, format them using the formatting bar above the input area, and then select the form of the output: label, list or table.
From PlanMaker and Excel to SQLite format
PlanMaker 2024 and PlanMaker NX can open and save SQLite databases directly. Thus, if you want to convert PlanMaker or Excel data into SQLite format, you can simply choose Save as in PlanMaker.
However, there are also numerous external tools for importing tables from PlanMaker or Excel into SQLite tables. One of these tools is the free DB Browser for SQLite for Windows, Mac and Linux.
First, make sure that the fields in the table and the SQLite database are arranged in the same order. This is easily done by aligning the column order of the table with that of the database. Then save the contents of the PlanMaker or Excel workbook in the format "CSV" (comma-separated values). Any existing formulas will be replaced by their static results.
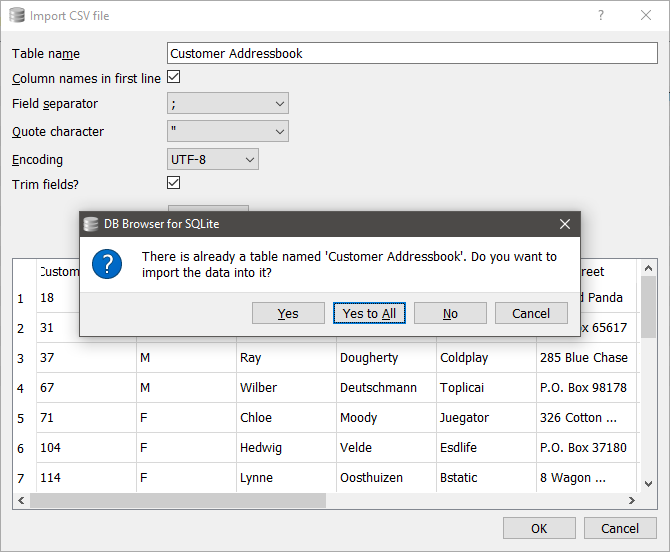
In DB Browser for SQLite, open the database to which you want to add your PlanMaker or Excel export. From there, click once on the table with the previous data and choose File | Import | Table from CSV file.
The program will then display an import dialog in which you should enter the same name as that of the table stored in the database. DB Browser will then ask if the data should be imported into the existing table. Confirm this step with "Yes, all".
If you click on the Browse data tab after importing, all data from the CSV file should be listed. Save the database in DB Browser via the Write changes button.
If the database is currently open in TextMaker, the contents in the database module should be refreshed via the command Refresh (shortcut key F9). If this doesn't work, close the database and re-open it to see the changes.
Epilog
You have now come full circle: In this blog post, you learned how to create a database for mail merges and populate it with data from PlanMaker or Excel. You were also shown how to design mail merges, envelopes and labels that use a database to send similar documents to multiple users.
Did you find this post useful? Would you like to know more about mail merges? Simply write your opinion and suggestions in the comments. We look forward to your feedback.
Comments
Thanks for putting this up there. I find simple, direct tutorials like this to be very helpful.